Battery and Harzish conversion to LGB 2073D U2 with Fosworks and My Loco Sound

dunnyrail

DOGS, Garden Railways, Steam Trains, Jive Dancing,
Staff member
GSC Moderator
25 Oct 2009
26,235
5,001
75
St.Neots Cambridgeshire UK
Best answers
0
Country flag
Having got up to 5 battery jobs on one of my batteryfications threads, I decided it was perhaps time for a new thread as that one was getting pretty busy.


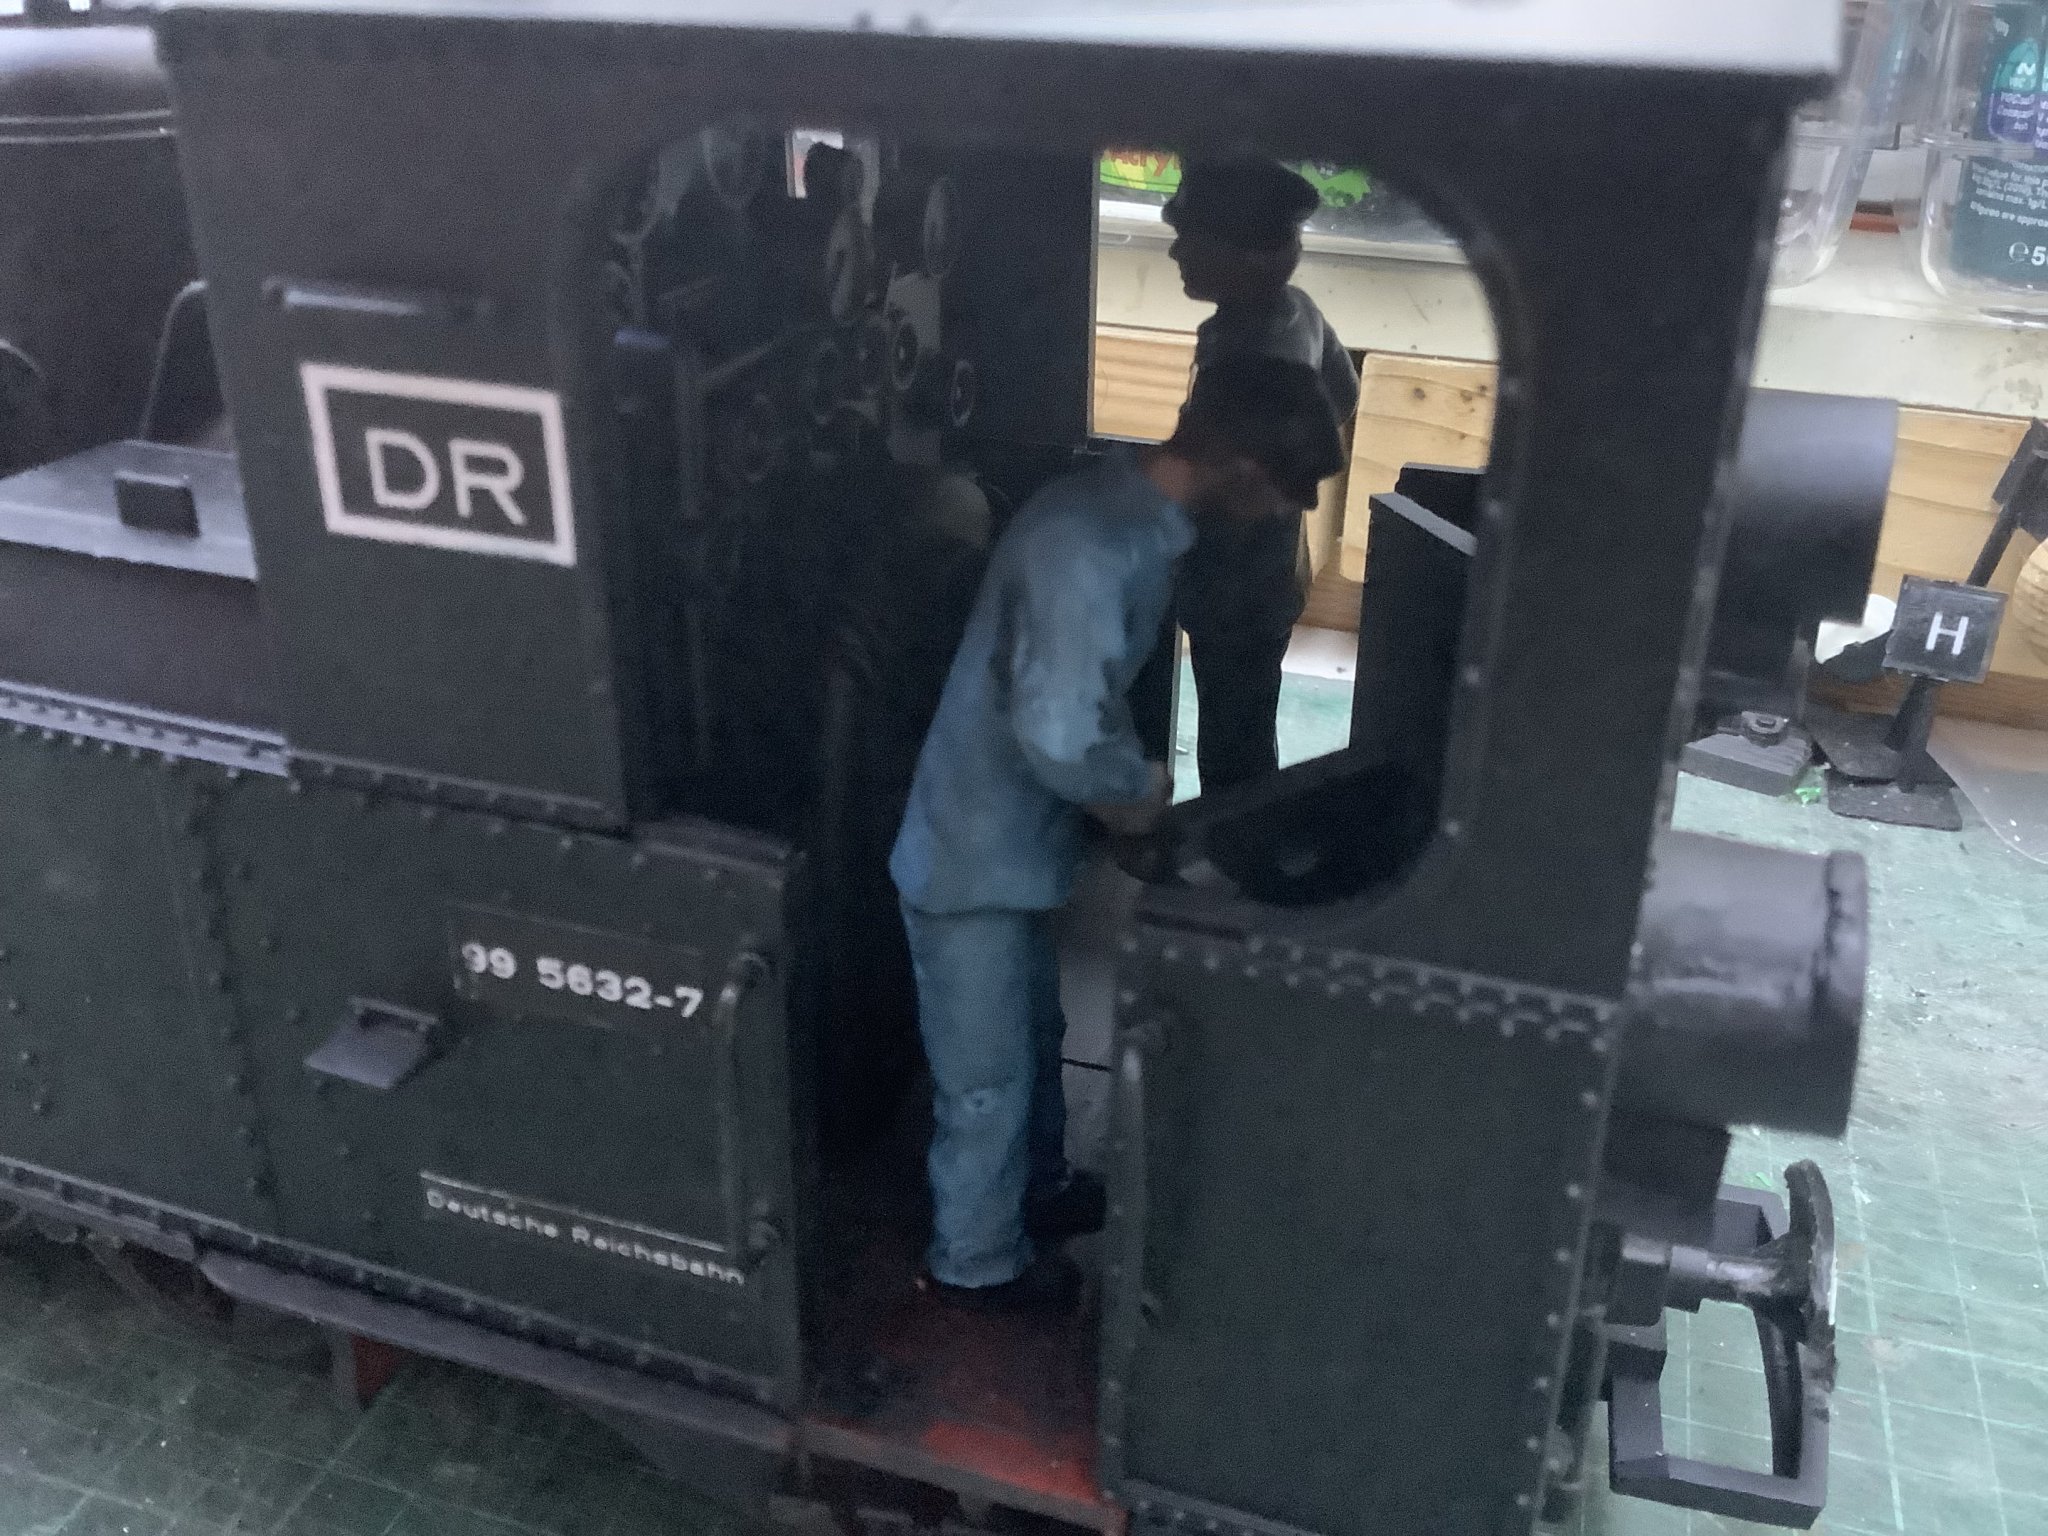
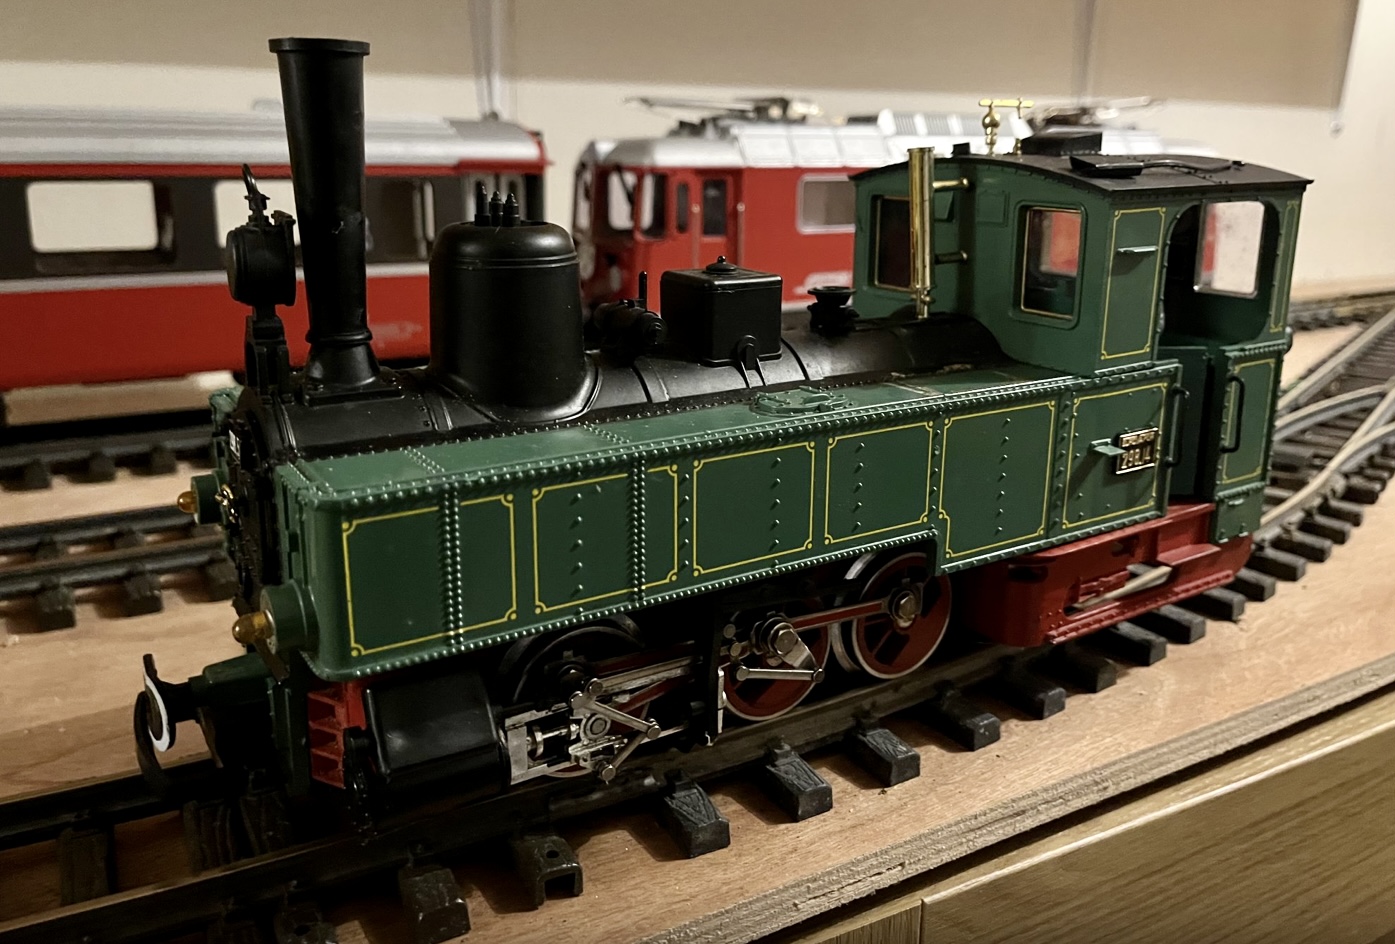
A look at a U2 gave me thoughts, thus this desire for another Harz loco came about. I have long desired one of the 2 0-6-2t’s that graced the Harz lines between 1890 and the mid 1950’s(NWE 71/2 becoming DR 99 5631/2). Though both moved on before my selected timeframe of 1981, I can live with a little imagination.

I have not found any pictures of them, but there is a good set of drawings available. The likeness to the U2 drew my thoughts around converting one of them and I had purchased a rather nice black sound fitted one a year or two back for the job.
F596CF48-F3C3-4EC9-8C80-018E5EF30CDE.jpeg
However this was so nice that I did not have the heart to hack it about and it currently lives on my loft railway. However when a non working cheepo one became available on the forum I decided to take a punt.
6B5B7F95-6585-4FFA-B82E-08A9E1EF7739.jpeg
This became the likely donor, as I expected there was not much wrong with it besides a part trashed valve gear. Once this was removed the motor whired happily turning the wheels so ‘let the hacking begin’. Work will require some repairs/bodgelling to the valve gear on one side, not beyond my abilities I hope.

A cursory look at the drawing indicated major surgery below the cab with the U2 steps and bits needing to be removed to reveal the rear bogie. Note sundry bits all over the workbench, a very thorough strip down was needed for this project.FCA324F5-DDCA-4FAE-9FE5-14608FAD328F.jpeg5E9D9DC7-47FE-4014-BA25-48067CE53550.jpeg
Below reveals the removed bits, more would need to go later.
847F521D-2A65-48A5-97B3-47D73B059478.jpeg
Having done that it was metal bashing time as the bogie needed some detail. Here you can see the U shaped piece to hold the detail including springs to the former naked bogie. You can see also the already cut brass side-frame that parts they will be attached to.
C80EC21A-9DBB-4A31-829B-F812FB70B0AC.jpeg
Next I found a couple of rather nice brass lost wax castings to fit the bill, the other 2 had been used on a Gauge 3 Wagon.
3A9951FF-EFBB-4AB6-8039-3BB73EB6FF64.jpeg
I cleaned up the back of the castings, carefully drilled and tapped them for 8ba screws to hold on to the extension detail piece. That has been silver soldered to the U shape with the 8ba screws passing through both into the spring unit. Note the holes in the bogie for 10ba screws to hold it all in place.
9C8FE3F4-D3F4-4D27-BECB-53A8A84C5969.jpeg
Here you can see the assembly fitted to the bogie, the spring assembly is a little large but I can live with that. Key part is it works and passes through R1 still, well it did once the step detail was removed.
0B74A655-DBDD-4F8D-927A-353DF53342DD.jpeg
Seen in place on the chassis. The weights really have to be in place as the spring on the bogie lifts the rear w heels considerably without them. More thinking for further on with the conversion.
575469C4-BDBE-4B6E-9A4A-84C8FCE03C3D.jpeg
 

Attachments

  • 7123FB54-6CAA-4A09-B257-AE8DB6C45FF3.jpeg
    7123FB54-6CAA-4A09-B257-AE8DB6C45FF3.jpeg
    415.6 KB · Views: 0

PhilP

G Scale, 7/8th's, Electronics
5 Jun 2013
33,649
3,532
Nottingham
Best answers
0
Country flag
Looks like an interesting conversion, Jon..

I have fancied one of these, to make more W&L-like.
I have not found a cheap donor yet.

PhilP
 

dunnyrail

DOGS, Garden Railways, Steam Trains, Jive Dancing,
Staff member
GSC Moderator
25 Oct 2009
26,235
5,001
75
St.Neots Cambridgeshire UK
Best answers
0
Country flag
What are you intending to make PhilP PhilP , the 0-8-0 10 Sir Drefaldwyn? ZB No 2 an 0-6-2 U2 is currently on hire from the ZB and would be an easier choice.

Back to my beastie, here is where the cutting gets more serious. You may have noted from the drawing that the Dome is cab end whereas on the U2 it is at the Chimney end. I pondered long and hard on this issue. Cutting out a dome to replace elsewhere is a serious job with many possible problems to be resolved. I did however decide to live with the second square dome rather than replacing it with a round one.

But in the end deciding to do nothing was not an issue. Looking very carefully at the U2 body I decided that a cut along the boiler top each side and inside of 2 boiler bands would produce an oblong that could be turned around, glued back in place to resolve that issue. Careful measurements of where to cut on the tank were critical to this as were neat square cuts across the boiler top, a Razor Saw is your friend for these sort of jobs. As is my modified one for getting into corners, this is a blade that has a few inches of the top ridge ground off. This has proved so useful in the past. It can be seen below fitted to the Razor Saw Handke. I probably need to do a new one now as this one is getting quite blunt.

In the end all went very well with little space on the tanks top to fill, rather more on the boiler, but a fake boiler band addition of Slaters Micro Strip can fill that. After a gentle clean up, below plasticard scraps were super glued to give some strength to the replaced cut out oblong together with some fill using car body filler and all was well with the hack.

Too late to turn back now.
07497EA5-8D18-4598-848A-F8A9BE94ED81.jpeg
Test fit to see if the cauts worked.
38FF6C2C-F64F-4935-AC6B-0E741315BF8C.jpeg
With the drawing to see if the change has given the correct feel of the modification. The generator between 2 domes will have to be removed, this fits elswhere on the loco. Fortunately it is a plug in job so will be easily removed with a small hole to fill.
8D40010E-0A0C-4CD5-ABBD-47C2F56335B6.jpeg
Below the body showing the scraps added to give strength. The weights are holding things in place while the superglue dries off.
688074DC-F956-47CE-828F-7696CE99B4A1.jpeg
After glue and fill but before temp boiler bands to see how it all hangs together. Note that I have also added tank downward extensions as well at this stage, to these will be added a footplate to go over where the cylinders are to the front of the loco. This will be the next task after I have removed the lining with my Fibre Pen. This lining would most certainly show up through the respray when attended to. Oh and the front top light has been hacked off as well.
0F0D62BF-20A4-4CC0-830D-442941C74AAD.jpeg
Then I will give the motor a good clean up, on a tea tray to ensure no loss of the thrust bearings. After that new LGB lube will be added to the motor, new connection wires that will go direct to the RC system. Then the thorny issue of takling the broken Valve gear will be looked at. Still plenty to do including quite a few small details and pipe runs, but all the work done so far has been described and photed.
 

dunnyrail

DOGS, Garden Railways, Steam Trains, Jive Dancing,
Staff member
GSC Moderator
25 Oct 2009
26,235
5,001
75
St.Neots Cambridgeshire UK
Best answers
0
Country flag
Have pulled the 2 halves of the motor chassis apart this morning, it looks as though there has been a previous battery job on it but not brave enough to remove all the pickups. At least the thrust bearings are intact and in the right place. The lube looks quite fresh, but not sure if it is genuine grease for LGB. Any ideas what to clean up with to remove it all before applying real LGB lube?
487B69CE-AEAF-419E-BDEF-733DBD9F013F.jpeg
All the pickups, spring wires etc will not be replaced.
 

MaybachMD

Registered
18 May 2018
129
10
66
Bromley, Kent
Best answers
0
Country flag
Jon

Thanks very much. Interesting conversion, looking forward to seeing progress. Thanks for starting the thread.

Simon
 

dunnyrail

DOGS, Garden Railways, Steam Trains, Jive Dancing,
Staff member
GSC Moderator
25 Oct 2009
26,235
5,001
75
St.Neots Cambridgeshire UK
Best answers
0
Country flag
My question about cleaning the gungbin the gearbox remains unanswered. Then yesterday I remembered the Garden Rail Special G scale maintenance book, this suggests cleaning old lube in LGB gearboxes with White Spirit or Lighter Fuel. I think that Lighter Fuel will be my choice as it evaporates pretty quick leaving no residue. Slight thread drift, I have always felt this to be a useful Bookzine to have in the workshop, a bit anal in places but it does have lots of useful tips.
870E8561-B5BA-4423-829B-7AD195AC265D.jpeg
 

JimmyB

Now retired - trains and fishing
23 Feb 2018
6,982
926
69
Weston-super-Mare
www.tumble-down-falls.co.uk
Best answers
0
Country flag
I would always be wary about clean old lubricants with solvents, as they may affect the plastic, metal parts, then yes. I would just wipe with a dry cloth or paper towel, as it is only the lubricant carrier you need to remove.
 

dunnyrail

DOGS, Garden Railways, Steam Trains, Jive Dancing,
Staff member
GSC Moderator
25 Oct 2009
26,235
5,001
75
St.Neots Cambridgeshire UK
Best answers
0
Country flag
I would always be wary about clean old lubricants with solvents, as they may affect the plastic, metal parts, then yes. I would just wipe with a dry cloth or paper towel, as it is only the lubricant carrier you need to remove.
Have been doing that a bit, cotton buds also help but there are bits that do not come fully clean leaving residue of the nasty black greasy gunge.
 

Paul M

Registered
25 Oct 2016
11,945
1,709
61
Royston
Best answers
0
Country flag
Have been doing that a bit, cotton buds also help but there are bits that do not come fully clean leaving residue of the nasty black greasy
I assume an ultrasonic cleaner would be too harsh for the plastic. For metal clock parts we use a mixture of ammonia, soapsuds and hot water. Whether that would work on plastic though, I'm not sure
 

PhilP

G Scale, 7/8th's, Electronics
5 Jun 2013
33,649
3,532
Nottingham
Best answers
0
Country flag
I think you would all be coming to an estate sale, if I was to use SW's ultrasonic cleaner for model parts. :eek::sweating:
:D

PhilP
 

Paul M

Registered
25 Oct 2016
11,945
1,709
61
Royston
Best answers
0
Country flag
I think you would all be coming to an estate sale, if I was to use SW's ultrasonic cleaner for model parts. :eek::sweating:
:D

PhilP
Well do it whilst she's not looking would be my advice
 

dunnyrail

DOGS, Garden Railways, Steam Trains, Jive Dancing,
Staff member
GSC Moderator
25 Oct 2009
26,235
5,001
75
St.Neots Cambridgeshire UK
Best answers
0
Country flag
I assume an ultrasonic cleaner would be too harsh for the plastic. For metal clock parts we use a mixture of ammonia, soapsuds and hot water. Whether that would work on plastic though, I'm not sure
Sounds a bit scary for plastic. Do not with to get any where near the sink for obvious parts loss issues.
 

PhilP

G Scale, 7/8th's, Electronics
5 Jun 2013
33,649
3,532
Nottingham
Best answers
0
Country flag
Sounds a bit scary for plastic. Do not with to get any where near the sink for obvious parts loss issues.
If using the sink:
ALWAYS work with the plug in!

PhilP
 

dunnyrail

DOGS, Garden Railways, Steam Trains, Jive Dancing,
Staff member
GSC Moderator
25 Oct 2009
26,235
5,001
75
St.Neots Cambridgeshire UK
Best answers
0
Country flag
If using the sink:
ALWAYS work with the plug in!

PhilP
How on earth would you know that pearl of wisdom?

Still back on track as it were, since my post the other day I have been cleaning up the gunge inside the chassis and today got the valve gear all fitted and working again.

But first the gunge. In the end there was a mixture of ckeaning methods, certainly kitchen roll featured heavily for all methods. Screwdriver used to get the big lumps of gunge out, toothpick between the gears and kichen roll shoved through axle holes gently with a small screwdriver. Finally cotton buds sometimes with some lighter fuel to fully clean things out and a wipe with kitchen rool. Taking care in all cases to ensure no bits of kitchen roll or cotton buds residue remaining. I still use old plastic cotton buds on the basis I bought them over 2 decades ago, when they run out I will buy current wooden stalked ones. Looking nice and clean and ready for the rebuild.

I do hope that this was never run indoors on a light carpet, that gunge got everywhere. A case of over lube if ever I saw one.
A47D245A-22FB-4D30-BEA6-C1AFC01C505D.jpeg
Next up was the valve gear, on looking and test fitting things were not as bad as I thought. This side there was a small split in the slidebar holding part, this has had a dab of superglue to keep it together. The part upside down is not required and will not be used, plus there was 1 missing so that is lucky.

Eagle eyed readers may have spotted that the prototype had Stephenson type Valve Gear, as this acts on the rear driver an awful lots of mods to a Stainz set would be required. So another compromise I have to live with.
1BACFD26-E5BF-4C05-9CEB-AD51AB2562A4.jpeg
Here on the other side was a more serious problem, where the screw fitted had split. The remedy was pretty simply resolved with a short piece of 5.5mm brass tube shoved over the short plastic now 2 part sleeve. Again some super glue to hold things in place was applied. Some black paint or Gun Blue will help loose the brass look. I may even use the blue on steel screws that are visible.

6C639ECB-C930-497B-BFB1-D4C3C297BAE5.jpeg
So ready for a test spin, but controller not working on the test bench. Think it may have had something to do with the metal LgB wheel-sets sitting on the TT gauge track!
3B475AD9-F99D-46B3-AAA5-E5E57E5D4BA7.jpeg
Happy to report that she runs as sweat as a nut and I will now get on more with the cosmetic details.
 

dunnyrail

DOGS, Garden Railways, Steam Trains, Jive Dancing,
Staff member
GSC Moderator
25 Oct 2009
26,235
5,001
75
St.Neots Cambridgeshire UK
Best answers
0
Country flag
Last post we were looking at some of the issues with the valve gear, these have been resolved but not in the most professional way. But at least they work and the loco managed a turn on the Operating session last Wednesday, a couple of issues were highlighted. Persistent at the frontend uncoupling on less than flat joints and a severe lack of haulage power. Both resolved see later.

Looking at the front end of the Harz beast it is very clear that some work was required. There is a sort of footplate that needed to be added, this was made out of plasticard fabrications and is held in place by a couple of 10BA screws.
IMG_7159.jpegIMG_7160.jpegIMG_7158.jpeg
Above you can see the unmodified front end with the holes for the screws just visible tapped for 10ba, below with it added and showing nicely the rear pony truck as revised. Also some fill in plasticard added to bulk out the side tanks. The box atop the tank in front of the cab is to hide the on/off switch and charging socket. The lining has all been removed with a fibre pen prior to black rattle canning.
IMG_7156.jpegIMG_7157.jpeg
That damaged valve gear shows up horribly above, more damage ensued during the rebuild works!

I feel it prudent to show some prototype pics here, tricky to find as this was a camera shy beast. Probably due to withdrawal in 1957 during the Communist era. Pictures of the Harz do exist before WW2 but it is difficult to ID some of the locomotives as many were of ‘Tourist’ type shots where the trains are just not important to the foter. I doubt that they were that favoured as their haulage would have been severely limited on the Broken and the ramp between Mägesprung and Sternhaus Ramberg. Though having been introduced by the NWE in 1890 it is just possible that their use would have been to between Wernigerode and Wernigerode Hasserode as the line in fact started between just those points as can be seen by the original Station Building at that point. Of course this could be a load of Gonads, tricky to be sure as finding dates of line opening in German language publications a bit tricky for the non German speaker.
IMG_7155.jpegIMG_7154.jpegIMG_7153.jpegIMG_7152.jpeg
 
Last edited:
  • Like
Reactions: 1 user

dunnyrail

DOGS, Garden Railways, Steam Trains, Jive Dancing,
Staff member
GSC Moderator
25 Oct 2009
26,235
5,001
75
St.Neots Cambridgeshire UK
Best answers
0
Country flag
Rear end lighting also needed to be attended to, the originals were not quite right so sundry plastic tube salvaged from till rolls has been used after butchering the originals. Also platforms where the lamps sit attended to with plasticard fabrication.

I have not as yet added working lights, it may be attended to in the future.
IMG_7162.jpegIMG_7164.jpeg
Sundry bits of tidying up and piping attended to on the boiler. The switch and charge socket can also be clearly seen in this view.
IMG_7163.jpeg
Lamp supports have been similarly fabricated at the front end.
IMG_7165.jpeg
This appeared to be a suitable place for some undercoat to be rattled on.
IMG_7171.jpeg
Then the all important electrics fit, this was where the delays realy accumulated. My choice of AA batteries just would not allow the top to fit, also the sound card chosen being a British Premium one just did not work for me, the bell was not present thus I had to get a new Euro sound card and new AAA battery pack. This took an age, will not go into the detail, Steve has been very busy this year. Plus look how that rear end is raised, clearly a good bit of weight required. Some was stuffed into the domes but after the new electrical gear arrived, a fit of some items using the domes was required, thus viaEstrecha viaEstrecha wisdom was followed to use the domes for some bits resulting in weight loss. Oh dear, another issue to resolve!
IMG_7172.jpeg
Those AA batteries just sit too low from the inside top of the tanks to fit the chassis. Still on the plus side at least the speaker fits neatly in the fire box. Though the MLS sound card is in the way of the Chimney screw assembly.
IMG_7161.jpeg
 
  • Like
Reactions: 1 user

dunnyrail

DOGS, Garden Railways, Steam Trains, Jive Dancing,
Staff member
GSC Moderator
25 Oct 2009
26,235
5,001
75
St.Neots Cambridgeshire UK
Best answers
0
Country flag
After the Matt Black rattle can job there were still things to do.

The few final jobs were to add some plasticard to lower the front coupling, on running it was found to cause uncoupling. The way the coupling is fitted precludes my normal lowering of the coupling by 20-30 though with a plastic insert, this has been done to the rear coupling.IMG_7672.jpeg
Another issue had been haulage, initially weights put into the domes would have added roughly 100g’s, enough to compensate for the loss of internal LGB fitted weights to make space for electrical gubbins. In the end a couple of 1.5 x 15cm lengths of lead have been screwed under the chassis above the wheels, 1 each side added near 100g. This appears to have resolved the issue with 16 axles being happily hauled up the 1:40 grade on a 4ft radius curve.
IMG_7673.jpeg
The switch and charging socket again, hidden in normal service by a removable box.

IMG_7676.jpeg
Lettering and numbering added from self made printed on sticky paper with UV spray to protect the inkjet process, something I never had to worry about when my Lazer was still working.

Finally a crew of 2 screwed from underneath to holes in their feet and legs. Ouch!
 

Attachments

  • IMG_7678.jpeg
    IMG_7678.jpeg
    630.2 KB · Views: 0
  • Like
Reactions: 1 user

MaybachMD

Registered
18 May 2018
129
10
66
Bromley, Kent
Best answers
0
Country flag
Jon

Thanks for the update. Really interesting and I am following it too. Looks to be coming along well.

Simon